09 marzo 2020


Per poter eseguire una Servlet Java è necessario utilizzare un Web Container, ovvero un Web Server in grado di supportare Java.

In pratica il Web Container fornisce un ambiente di esecuzione a dei componenti, le Servlet, che sono usate per rispondere a richieste http / https effettuate da dei client (browser).


In questo articolo vedremo come installare il Web Container di riferimento, Tomcat, e come installare l'IDE Eclipse per lo sviluppo di Web App.

NB: questo articolo assume che abbiate già installato correttamente un JDK di Java. Se così non fosse leggete prima questo documento (si raccomanda di installare l'ultima versione del JDK disponibile).

Installare Apache Tomcat

Dalla home page del progetto, selezionare l'ultima versione stabile del Web Container; a inizio di agosto 2021 è ancora la versione 10.
Consiglio di scaricare il file .zip a 32 o a 64 bit (in base al proprio sistema operativo).
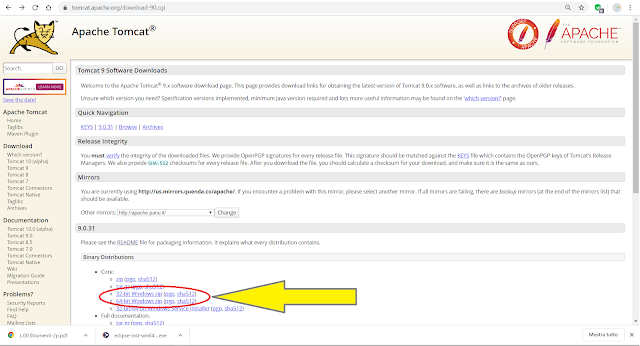


Una volta scaricato il file, scompattarlo in una cartella. Annotare dove si trova perché, successivamente, da questa cartella si potrà accedere ai comandi per eseguirlo / fermarlo (cartella bin/ ) e, come vedremo, il percorso della cartella servirà per integrare Tomcat all'interno dell'IDE Eclipse.
Per verificare che tutto funzioni basta eseguire il file startup.bat da dentro la cartella bin/.


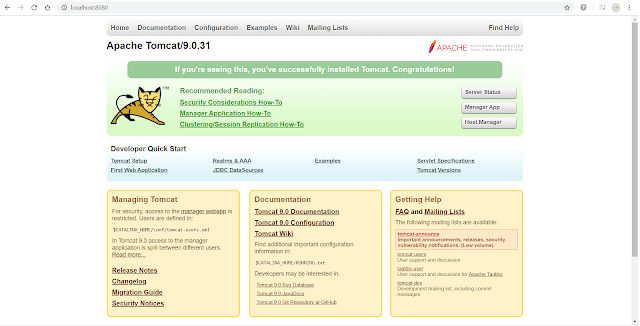
A questo punto, con il proprio browser preferito, andare alla pagina localhost:8080 (si noti la porta di default usata da Tomcat: la porta 8080): dovrebbe partire la pagina iniziale come da figura.


Nota bene: c'è una finestra, con scritte su fondo nero, che rimane aperta: è la console che ha fatto partire Tomcat e rappresenta lo standard output delle applicazioni (cioè, se da una programma Java vengono eseguite delle System.out, l'output andrà a finire su tale finestra).


Per chiudere Tomcat basterà chiudere la finestra di console oppure, preferibilmente, eseguire il file shutdown.bat della cartella bin/.
Si raccomanda di non lasciarlo attivo affinché, dopo aver installato Eclipse, possa funzionare anche come server comandato dall'IDE.

Installare Eclipse

Dalla pagina principale di Eclipse.org fare clic su "Get Eclipse IDE 2021-06".


Confermato e completato il download dell'eseguibile, verrà chiesta la versione da installare. Per lo sviluppo di Web App (servlet o JSP) è necessario scegliere "Eclipse IDE for Enterprise Java Developers".


A questo punto è necessario indicare la Java Virtual Machine da usare (se non l'avete già fatto vi consiglio di installare l'ultima versione del JDK) nonché il percorso di destinazione:


L'ultima scelta riguarda dove posizionare la cartella di lavoro (workspace) che conterrà tutti i progetti e i sorgenti usati da Eclipse. Se, come me, avete già installato un'altra versione di Eclipse, vi consiglio di indicare, come workspace, una nuova cartella, per esempio eclipse-workspace-ee:


La prima Web App

 Una volta completata l'installazione e mandato in esecuzione l'IDE, compare una schermata iniziale da cui è possibile scegliere "Create a new Java EE Web Project". Nella procedura guidata è necessario dare un nome al nuovo progetto e poi scegliere "New runtime".


Si seleziona la versione di Apache Tomcat installata; nel nostro caso la 10.


Comparirà una nuova schermata dove è possibile, attraverso il pulsante Browse, andare a scegliere la cartella di installazione del Tomcat (è quella in cui è stato scompattato il file di installazione).


A questo punto siamo pronti. Viene creato un progetto per una nuova Web App con, a sinistra, la visualizzazione della gerarchia su file system; al centro troverà spazio la finestra con i sorgenti.


Facendo clic sul nome del progetto si può scegliere, dal menu contestuale, New > Servlet:


A questo punto è possibile impostare, sulla procedura guidata, tutte le caratteristiche principali della servlet; nel primo passaggio specificare il nome del package e il nome della classe:


Nel passaggio successivo si possono selezionare i check box con i metodi da implementare; di default alcuni sono già selezionati. Selezionare anche init e destroy.


Nell'ultimo passaggio si possono inserire eventuali parametri iniziali e si può personalizzare il mapping sull'URL (sarà l'indirizzo da specificare sul browser per eseguire la servlet):


A questo punto compariranno i sorgenti Java creati automaticamente per la prima servlet; il significato delle diverse parti sarà spiegato in un tutorial separato.

Test della servlet su Tomcat

Se volessimo mandare in esecuzione la Servlet, dovremmo eseguirla sul Tomcat. Le possibilità sono due:

  1. la prima è quella di mandare in esecuzione Tomcat da dentro Eclipse e verificare subito il risultato della servlet
  2. la seconda consiste nel creare un pacchetto di installazione (chiamato WAR: Web ARchive) e installarlo sul Tomcat per poi farlo partire/fermare come abbiamo fatto nella prima parte dell'articolo usando gli script della cartella bin/.
La prima modalità è usata durante il test del progetto, mentre la seconda è utilizzata quando, terminata l'applicazione, vogliamo trasferirla su un Tomcat di "produzione" e farla usare dagli utenti.
Vediamo entrambe le strade.

Tomcat "comandato" da Eclipse

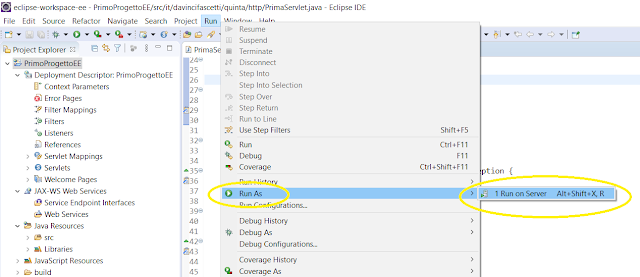
Per mandare mandare in esecuzione il progetto da Eclipse è sufficiente fare clic con il pulsante destro del mouse e, dal menu contestuale, scegliere Run As... > Run on server.


La nuova finestra permette di scegliere il server su cui eseguirlo; se non ne è stato installato più di uno, la scelta è obbligata. Ma se ne sono stati installati molti, è questo il momento per decidere su quale server eseguire la Web App.


Se, come immagino, il server è sempre e solo questo, si può spuntare la casella "Always use this server when running this project" per velocizzare le esecuzioni successive.
L'esecuzione del server deve essere autorizzata dal firewall di Windows se, come si spera, è stato attivato.


Una volta eseguito il server, su Eclipse si apre, centralmente, un browser che punta sulla servlet creata (e che risponde all'indirizzo http://localhost:8080/[nomeProgetto]/[nomeServlet])


Lo stesso risultato si ottiene se, aprendo un browser esterno, si inserisce l'URL http://localhost:8080/[nomeProgetto]/[nomeServlet]


Si presti attenzione al fatto che, in questo momento, Tomcat viene usato solo per la WebApp in uso. Si nota perché accedendo semplicemente alla pagina localhost:8080, non compare più la pagina principale di Tomcat.
Una volta terminato il debug, si può fermare l'esecuzione di Tomcat agendo sul pulsante di stop rosso presente sulla finestra in basso.


Creazione del file WAR

L'ultimo passaggio consiste nel creare il file WAR del progetto. Fare clic con il pulsante destro del mouse sul nome del progetto. Poi Export > WAR file.
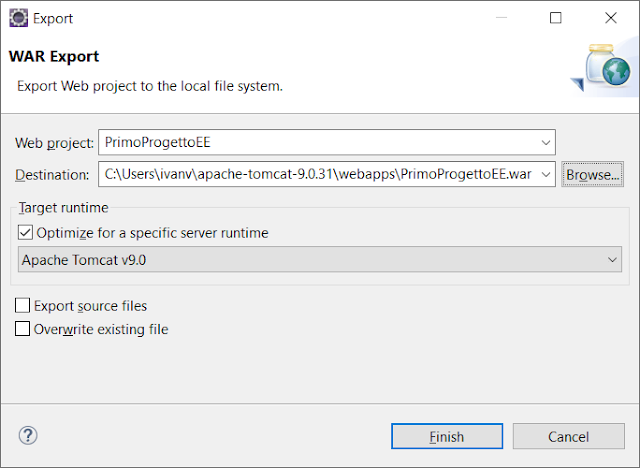


Dalla finestra si può scegliere, come destinazione, la cartella webapps presente sull'installazione di Tomcat.


Ogni volta che si eseguirà Tomcat (come applicazione esterna) la Web App che abbiamo creato sarà presente ed in esecuzione.

Conclusioni

Abbiamo creato un ambiente minimo per lo sviluppo e il deploy di Web App Java.
Ora siamo pronti per approfondire lo sviluppo server side in Java. In questo contesto si parla di tecnologie per lo sviluppo di applicazioni di classe enterprise e l'ambiente fornito prende il nome di Java Platform, Enterprise Edition o, semplicemente, Java EE.


30 ottobre 2017

Sabato 28 settembre 2017 si è svolto, in tutta Italia, il Linux Day. Anche nella scuola dove insegno, l'ITIS "G. Marconi" di Pontedera (PI) è stato organizzato un incontro. In questa pagina la scaletta degli interventi. Riassumo qui i contenuti del mio intervento, che ha trattato gli Open Data e gli strumenti per recuperarli, gestirli, pubblicarli.
Video della prima parte dell'intervento:

La presentazione

La presentazione completa (in parte rivista) condivisa su slideshare:


Esempio: scuole secondarie superiori provincia di Pisa

L'esempio creato durante l'intervento (dataset importato dal MIUR sulle scuole secondarie superiori della Provincia di Pisa):


Esempio: biblioteche provincia di Pisa

Un esempio di dati (biblioteche della provincia di Pisa) con l'utilizzo di Street View per il recupero di immagini e l'utilizzo delle Google Fusion Table per la pubblicazione di schede HTML, una mappa con le informazioni georeferenziate, un grafico di sintesi sui dati presenti nel dataset:

30 ottobre 2016

In a previous post (see "Programming mBot with App Inventor 2") I've explained how to use a low level communication API (called Orion) to control a robot, called mBot, using App Inventor.

A robot, called mBot.


I've discovered a recently extension provided by MakeBlock in order to program mBot from App Inventor: http://learn.makeblock.com/en/use-mbot-with-app-inventor/

Using this extension is much more simple than programming via Orion. An extension of App Inventor is a new library of visual blocks. So, if you use it, the new blocs will appear as usual ones but in a new category. These blocks, in particular, are high level commands to communicate to a remote mBot (using bluetooth connection). You can send moving commands, read values from sensors and so on.


Please refer to the cited web page for full details. Stay tuned if you want some more working examples that are using this new and interesting opportunity!

10 aprile 2016

I've recently purchased a robot, based on a board that is Arduino Uno compatibile, called mBot.

It has a lot of interesting features that make it suitable for teaching, and its price is really interesting (nearly 80 euros/80 US dollars). It is made by MakeBlock and I'll present its main features in an upcoming post.

This post is about the possibility to command it without its default editor, mBlock (a really good one, indeed; see http://www.mblock.cc/), but using App Inventor. I'm interested in App Inventor because I teach it in my classes and I enjoy writing apps for Android that will command mBot.

From App Inventor to mBot: how communication works

mBot uses a custom protocol in order to send commands to the robot and receive results or values from the robot's sensors. This protocol is called Orion and you can find all the details here.
The first app I've written uses a really simple command to change the color of the two RGB leds.
The command has this general form (every number is expressed in base 16):

ff 55 09 00 02 08 07 02 [led] [Red] [Green] [Blue]

mBot with its RGB leds
Instead of [led] you must specify the led for which you would like to change the color (1 means left, 2 right, 0 both). Instead of[Red] you have to specify the intensity of Red component of RGB (values from 0 to 255) and the same must be done with [Green] and [Blue] values (for an explanation of RGB color see, for example, this link).

Building the app

Opened App Invetor, I've chosen to use a ListPicker component in order to select the bluetooth device to communicate with (please notice that the device must be paired from Android). When you choose that device, three sliders should appear (one for any color component: Red, Green and Blue).
Every time you change a slider, a button background will change its color, showing the resulting RGB color. When you press the button, it will communicate the new color to the device.
I've inserted also two check boxes: you can select the leds that you want to change (left, right or both).
We need a Bluetooth client in order to send commands to the robot.
The resulting app will look, in App Inventor designer, like in the image below.
App Inventor - Designer editor

Now it's time to do the appropriate program in the Blocks editor.
First of all, we populate the ListPicker with known devices. Also when the user chooses one device, if the connection goes well, we will show the other commands.


Every time a slider changes its position, we manage the change invoking a procedure called cambiaColore (i.e. changeColor) that reads the floor value of every slider and uses it to change the background color of the button.


Now it is time to write a procedure, called command, that sends the initial bytes of the protocol. The last one is set using the values of the selected checkboxes.


Please notice that I've used the Send1ByteNumber method to send every number (converted in decimal base).
Now, every time the user clicks on the button, we send the previous command to the robot, using the bluetooth connection, and the additional details about choosen colors:

Conclusion

In this post I've showed the possibility to command an mBot from App Inventor, using commands sent via Bluetooth. The protocol allows to send commands but also to receive data, for example from sensors. So you can design an app that interacts with the robot in a lot of useful and interesting ways. Please let me know if you build something with your robot!


If you need the AIA file (source file for App Inventor), please check this link.

09 ottobre 2015

Title: Raspberry Pi Essentials
Author: Jack Creasey
Publisher: PACKT Publishing
Publishing date: April 2015
Subtitle: Leverage the power of programming to use the Raspberry Pi to create awesome games

Link: https://www.packtpub.com/hardware-and-creative/raspberry-pi-projects-kids-second-edition


Review
“Raspberry Essentials” aims to illustrate the basics of Raspberry Pi, from installation to advanced use. The book is meant for both experienced DIY and first time amateurs.
In the first part of the book, it wouldn’t have hurt to include more details for first time users.
As an example, at page 14:
“Ctrl + Alt + Backspace: Use this key combination to log out of the current Xsession user (use Xsession to login).
Ctrl + Alt + F1: Use this key combination to switch to a command session on tty1 (type exit to close)
Ctrl + Alt + F7: Use this key combination to switch back to the graphical desktop
Ctrl + Alt + F2 through F6: Use this key combination to switch to a command session on tty2-tty6.”

The passage above works for an experienced user -- meaning someone who knows developer tools and has a basic knowledge of administrative tasks of a Linux OS -- but I’m afraid that a first time user who has never seen a Linux OS wouldn’t understand what is a Xsession, an tty1, tty2 and so on!
If you are a Linux guy, this book will prove to be very useful, thanks to plenty of tips and hands-on tutorial that will help you to achieve various tasks, from network configuration to appropriate monitor customization. In addition to that, readers will learn, step by step, to keep the development environment up to date.
Some complex tasks and configuration files can be downloaded from a web site.
Unfortunately some bash scripts (or python scripts) are presented in their final form, without a good explanation about all their functions. This way, programmers can use them as a “recipe” or should put in a lot of work on their own to try to fully understand them.
Chapter 5, "Port Input and Output on the Raspberry Pi", and Chapter 6, "Driving I2C Peripherals on the Raspberry Pi", are much more useful and well developed but, in my opinion, the scripts could have used a deeper explanation; it would have tremendously improved the whole presentation.
Chapter 7, "Going Mobile with Raspberry Pi", and 8, "Creating a Raspberry Pi Line-following Robot", are great reading materials for DIY aficionados. They pick up some ideas from previous chapters (like using a camera) and they add great advice for someone who needs only a few tips to achieve his goals. Maybe this is the real target of the book: a DIY fan with a lot of time to try something new and an outstanding ability to learn in autonomy.
I would have liked the book more if the author had developed the topics in a way that could have been easier to understand. Maybe the author could have focused on less topics. I would recommend to revise the book paying more attention to every single subject from the beginning to end.

Title: Raspberry Pi Projects for Kids - Second Edition
Author: Daniel Bates
Publisher: PACKT Publishing
Publishing date: April 2015
Subtitle: Leverage the power of programming to use the Raspberry Pi to create awesome games

Link: https://www.packtpub.com/hardware-and-creative/raspberry-pi-projects-kids-second-edition


Review


The first chapter of the book follows a tradition of other Pack books about Raspberry Pi and describes the system and how to set it up.
In the second chapter, the author introduces the main programming language featured in the book: Scratch.
This chapter represents a good introduction to the language and to program a simple animation, while the next one goes deeper on the language, using another game as an example.
The fourth chapter deals with Python. I must admit that, in my opinion, this chapter aims to cover too many subjects at once. It might prove to be difficult for the reader to absorbe all the information provided.
But if the reader manages to keep up with everything, there are a lot of useful examples and all the main features of Python are discussed.
In the fifth chapter, the user is guided through creating a game that is programmed in Python, and the author shows how to create a simple game controller, building it from scratch.
After this, there’s a chapter that focuses on using Google Maps inside a Python program and teaches how to personalize a program adding buttons and other widgets to it.
The last chapter focuses on how to play notes and songs using Sonic Pi. Readers will understand how to do it via simple commands, writing a program that acts as a complete composer.
The entire book is full of really interesting examples, but I am under the impression that it shows the readers the pros and cons of different technologies without going deeper in any of them. A little more that 120 pages can’t be enough to discuss all the fascinating topics mentioned in the book. 
The book doesn’t seem to be suitable for kids, but it would be a good choice for parents who want to learn to program captivating games, maybe to share them with their children. 
In this way, it can be wonderful choice, but if you want to continue to program games, you are bound to need further reading, at least about Scratch and Python.

30 settembre 2015


Il 25 settembre ho avuto la possibilità di partecipare al Todi Appy Days, giunto alla seconda edizione, in qualità di speaker.
Nel mio intervento, intitolato "Sviluppare App a scuola", ho esaminato due aspetti:

  1. il primo metodologico: cosa significa "insegnare informatica" oggi;
  2. il secondo "operativo": ho sviluppato insieme al pubblico un'app con Pocket Code (sito di riferimento https://share.catrob.at/pocketcode/)
La presentazione è stata fatta usando Prezi (qui trovate le diverse slide presentate).
A questo link potete accedere all'app creata (in realtà, per problemi tecnici, le immagini dei diversi sprite sono state inserite in un secondo momento, mentre durante la presentazione esse sono state disegnate con Pocket Paint).

Chi è interessato a sapere, passo dopo passo, come creare l'app, può fare riferimento a questo documento (è un documento molto sintetico; è servito a me come promemoria durante la presentazione; se avete modo di usarlo fatemi avere un vostro feedback!).

L'esperienza è stata molto positiva, sotto tutti i punti di vista: Todi è una città davvero bella e caratteristica, l'organizzazione dell'evento è stata puntuale ed efficace e il pubblico presente ha apprezzato l'intervento e fatto numerosi commenti e domande.

Se qualcuno dei presenti alla presentazione legge questo post, ricordo che è disponibile un questionario a questa pagina (inutile dire che solo i presenti all'intervento sono pregati di compilarlo).

Per eventuali ulteriori chiarimenti o segnalazioni scrivetemi una mail all'indirizzo indicato nella presentazione.

Grazie!